How to Meal Prep Salads and Lunch Bowls
Learning to meal prep salads for easy, transportable lunch bowls will save you tons of headaches during the week. Perfect for lunch on the go and make-ahead lunches when you work from home.
Servings 2 jars
Calories
Ingredients
Storage
- 2 each containers for transporting salad approximately 32 oz or 4 cup size
- 2 each containers for greens approximately 16 oz or 2 cup size
- 2 each small containers for greens 2-4 oz size
Cooked Grains
- 1 cup quinoa
- 1 cup brown rice
- 1 cup barley
- 1 cup wheatberries
- 2 cups soba noodles
Protein
- 1 ½ cup cooked or canned beans black beans, red beans, pinto beans, garbanzo beans, white beans
- 1 14 ounce package tofu
- 2 cups tempeh
- ¼ cup nuts almonds, cashews, peanuts or walnuts
- ¼ cup seeds pumpkin, hemp, sunflower
- 1 cup sprouts lentil, mung bean or other
Vegetables
- tomatoes
- cucumbers
- carrots
- roasted vegetables broccoli, cauliflower, zucchini, sweet potatoes, onions, bell peppers, eggplant
- broccoli
- cauliflower
- onion
- bell peppers
- avocado
Fresh Fruit
- berries blueberries, raspberries, strawberries
- citrus segments orange, grapefruit
- pomegranate arils
- apples sliced
- pears sliced
Sauces or Dressings
Instructions
Prep the Ingredients
- Choose all the ingredients you plan to use. If anything needs to be cooked, such as beans or grains, prepare them in advance and cool completely.
- Cut and prep the vegetables you will be using for your lunch bowls.
- Prepare your sauce or dressing and store in small containers.
Store
- Place beans and grains in the bottom of your bowl.
- Next layer sturdy vegetables
- Top with more delicate vegetables such as tomatoes and cucumbers.
- Package your dressing and greens separately or place the greens on the top of the container.
Eat
- Combine all your ingredients and sauce in a bowl and toss to coat all the ingredients with the sauce.
- If eating on the go, add your dressing and greens to your container and shake until the dressing is distributed evenly.
Notes
Nutrition is not provided for this recipe as it will be based on the ingredients you cook and prepare for this recipe.
Tips for Keeping Salads Fresh All Week Long
Storage: There are a few considerations when it comes to the best way to store salads or lunch bowls.
- Decide whether you want to premake your salad bowls or store all the different ingredients separately to use throughout the week. Sometimes I find it helpful to make my salad bowls for 1-3 days and then store the remaining ingredients to make the others closer to the time I will eat them,
- Pack the greens separately and then add them when you are ready to eat.
- If storing the salads together, place heavier vegetables and those with more liquid underneath the more delicate vegetables such as the greens or sprouts.
- Store the dressing separately in a small container so you don’t end up with sogging lettuce.
- Delicate ingredients such as leafy greens, berries, tomatoes, and cucumbers may be the best to cut closer to the time you plan to use them.
- Use intact fruits and vegetables when possible such as cherry tomatoes, grape tomatoes, blueberries. These are more likely to hold up when stored in a container to carry to work.
- When transporting avocado, apples, or other ingredients that brown easily you can add a bit of lemon or lime juice to keep them from browning. Though I still recommend cutting them within 24 hours of mealtime.
- Transfer cooked foods to shallow (rather than deep) pans. This allows the food to cool down more quickly.
- Don't cover with a lid or wrap until fully cool. A lid traps the heat inside and doesn't allow for airflow which helps the food cool.
- The best place for cooling to take place is inside refrigeration. Or for a quick cool, you can place items in the freezer.
- Stir the food while it’s cooling as the food on top that is being hit with cold air will cool first and stirring brings the warm parts to the top to cool faster.
- My preference is a rectangle or circle container that allows me to neatly arrange my salad.
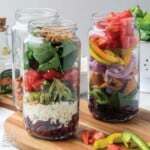
- When layering your lunch bowl in a container or jar, start with the heaviest and/or sturdiest ingredients first such as the beans and grains. More delicate foods such as tomatoes, cucumbers, and cheeses are best added to the top.
- Keep the dressing separate and add just before you want to eat. If that isn't possible, place the dressing in the bottom of the container or jar.
- Lettuce and other greens are best kept separate until you eat or placed on top of all the other ingredients.
- Be sure to completely dry your washed greens with a salad spinner or on a tea towel.